The Complete Free Deployment Guide: Django + React (Vercel, Render, & Neon)
Deploying a full-stack application often feels like the hardest part of development. You’ve built something amazing locally, but now you need your React frontend, Django backend, and database to work together on the internet—without spending a dime.
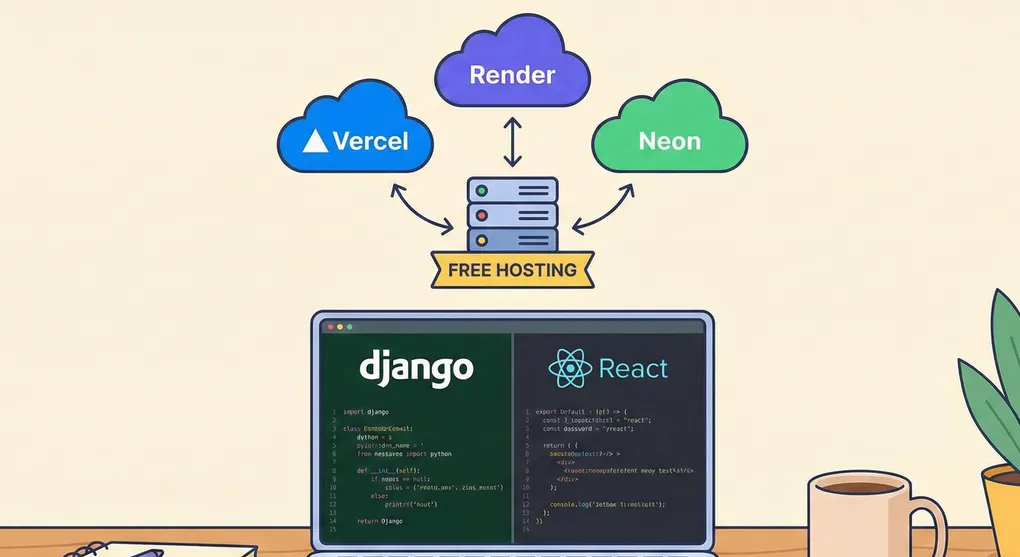
This guide walks you through deploying your app completely free using:
- Django (Backend) on Render’s free tier (512MB RAM, sleeps after 15min inactivity)
- React (Frontend) on Vercel’s free tier (unlimited bandwidth, 100GB per month)
- PostgreSQL (Database) on Neon’s free tier (512MB storage, auto-pauses when idle)
This “split-hosting” strategy maximizes free tier limits and lets each platform do what it does best. Vercel delivers static files through its global CDN, Render manages Python processes, and Neon provides serverless Postgres with automatic scaling.
Prerequisites: What You Need Before Starting
Your Project Structure
This guide assumes a monorepo where both frontend and backend share one Git repository:
my-app/
├── backend/              # Django project
│   ├── manage.py
│   ├── requirements.txt
│   ├── db.sqlite3       # Local dev database (won't be deployed)
│   └── myproject/       # Inner project folder
│       ├── __init__.py
│       ├── settings.py
│       ├── urls.py
│       └── wsgi.py
├── frontend/            # React project
│   ├── package.json
│   ├── vite.config.js   # or webpack config for CRA
│   ├── src/
│   │   └── App.jsx
│   └── public/
├── .gitignore
└── README.md
Required Accounts (all free)
- GitHub account (to host your code)
- Render account (for Django backend hosting)
- Vercel account (for React frontend hosting)
- Neon account (for PostgreSQL database)
What You Should Know
- Basic Git commands (commit, push)
- How to navigate terminal/command prompt
- Your Django project runs locally without errors
- Your React app builds successfully with
npm run build
Phase 1: Prepare Django for Production
Step 1: Install Production Dependencies
Navigate to your backend folder and install required packages:
cd backend
pip install gunicorn psycopg2-binary dj-database-url whitenoise django-cors-headers
What each package does:
- gunicorn - Production WSGI server (replaces
runserver) - psycopg2-binary - PostgreSQL database adapter
- dj-database-url - Parses database connection URLs
- whitenoise - Serves static files without nginx
- django-cors-headers - Allows cross-origin requests from Vercel
Step 2: Update requirements.txt
Generate an updated requirements file:
pip freeze > requirements.txtOpen requirements.txt and verify it includes all the packages we just installed. It should contain lines like:
Django==4.2.7
gunicorn==21.2.0
psycopg2-binary==2.9.9
dj-database-url==2.1.0
whitenoise==6.6.0
django-cors-headers==4.3.1
Step 3: Configure settings.py
Open backend/myproject/settings.py and make these changes:
Add imports at the top:
import os
import dj_database_url
Update ALLOWED_HOSTS:
# For initial setup, allow all hosts
# Later, restrict to: ['your-app.onrender.com', 'your-frontend.vercel.app']
ALLOWED_HOSTS = ['*']
Update INSTALLED_APPS to include corsheaders:
INSTALLED_APPS = [
    'django.contrib.admin',
    'django.contrib.auth',
    'django.contrib.contenttypes',
    'django.contrib.sessions',
    'django.contrib.messages',
    'django.contrib.staticfiles',
    'corsheaders',  # Add this
    # ... your other apps
]
Update MIDDLEWARE (order matters!):
MIDDLEWARE = [
    'django.middleware.security.SecurityMiddleware',
    'whitenoise.middleware.WhiteNoiseMiddleware',  # Add right after SecurityMiddleware
    'corsheaders.middleware.CorsMiddleware',       # Add before CommonMiddleware
    'django.contrib.sessions.middleware.SessionMiddleware',
    'django.middleware.common.CommonMiddleware',
    'django.middleware.csrf.CsrfViewMiddleware',
    'django.contrib.auth.middleware.AuthenticationMiddleware',
    'django.contrib.messages.middleware.MessageMiddleware',
    'django.middleware.clickjacking.XFrameOptionsMiddleware',
]
Add CORS settings:
# Allow requests from any origin (for development)
# In production, use: CORS_ALLOWED_ORIGINS = ['https://your-app.vercel.app']
CORS_ALLOW_ALL_ORIGINS = True

# If using authentication/cookies across domains:
CORS_ALLOW_CREDENTIALS = True
Update DATABASE configuration:
# Automatically switch between SQLite (local) and PostgreSQL (production)
if 'DATABASE_URL' in os.environ:
    DATABASES = {
        'default': dj_database_url.config(
            default=os.environ.get('DATABASE_URL'),
            conn_max_age=600,  # Connection pooling
            conn_health_checks=True,
        )
    }
else:
    # Local development database
    DATABASES = {
        'default': {
            'ENGINE': 'django.db.backends.sqlite3',
            'NAME': BASE_DIR / 'db.sqlite3',
        }
    }
Configure static files:
STATIC_URL = '/static/'
STATIC_ROOT = os.path.join(BASE_DIR, 'staticfiles')

# For Django 4.2+
STORAGES = {
    "default": {
        "BACKEND": "django.core.files.storage.FileSystemStorage",
    },
    "staticfiles": {
        "BACKEND": "whitenoise.storage.CompressedManifestStaticFilesStorage",
    },
}

# For Django < 4.2, use this instead:
# STATICFILES_STORAGE = 'whitenoise.storage.CompressedManifestStaticFilesStorage'
Step 4: Create build.sh Script
In your backend/ folder, create a new file called build.sh:
#!/usr/bin/env bash
# Exit on error
set -o errexit

# Install dependencies
pip install -r requirements.txt

# Collect static files
python manage.py collectstatic --no-input

# Run database migrations
python manage.py migrate
Make the script executable:
chmod +x build.shStep 5: Update .gitignore
Make sure your .gitignore includes:
# Django
*.pyc
__pycache__/
db.sqlite3
staticfiles/
.env

# React
node_modules/
frontend/build/
frontend/dist/
Step 6: Test Locally
Before deploying, verify everything works:
# Collect static files
python manage.py collectstatic

# Check for issues
python manage.py check

# Run the server with Gunicorn
gunicorn myproject.wsgi:application
Visit http://localhost:8000. If it works, you’re ready to deploy.
Phase 2: Set Up PostgreSQL Database (Neon)
Render’s free tier uses ephemeral storage (files disappear on restart), so we need a cloud database.
Step 1: Create Neon Account
- Go to neon.tech
- Sign up with GitHub (easiest option)
- Verify your email if prompted
Step 2: Create a New Project
- Click “Create a project” or “New Project”
- Fill in the details:
- Project name:
my-app-db(or whatever you prefer) - PostgreSQL version: 16 (latest stable)
- Region: Choose closest to your Render server location
- US:
us-east-1orus-west-2 - EU:
eu-central-1
- US:
- Project name:
- Click “Create project”
Step 3: Get Your Connection String
- On the project dashboard, you’ll see a Connection Details section
- Make sure “Connection string” is selected
- Copy the entire connection string. It looks like:
postgres://username:password@ep-cool-darkness-123456.us-east-2.aws.neon.tech/neondb?sslmode=requireImportant: Save this somewhere safe. You’ll need it in the next phase.
Phase 3: Deploy Backend to Render
Step 1: Push Code to GitHub
If you haven’t already:
# Initialize git (if needed)
git init

# Add all files
git add .

# Commit
git commit -m "Prepare for deployment"

# Create a new repo on GitHub, then:
git remote add origin https://github.com/yourusername/your-repo.git
git branch -M main
git push -u origin main
Step 2: Create Render Web Service
- Go to render.com
- Sign up/log in with GitHub
- Click “New +” → “Web Service”
- Click “Connect account” to authorize GitHub
- Find your repository and click “Connect”
Step 3: Configure Service Settings
Basic Settings:
- Name:
my-app-backend(this becomes your-app-backend.onrender.com) - Region: Same as your Neon database (e.g., Oregon for us-west-2)
- Branch:
main(or your default branch) - Root Directory:
backend(the folder containing manage.py) - Runtime:
Python 3 - Build Command:
./build.sh - Start Command:
gunicorn myproject.wsgi:application- ⚠️ Replace
myprojectwith your actual Django project folder name
- ⚠️ Replace
Instance Type:
- Select “Free” (512 MB RAM, spins down after 15 minutes of inactivity)
Step 4: Add Environment Variables
Scroll down to “Environment Variables” and click “Add Environment Variable”:
Variable 1:
- Key:
DATABASE_URL - Value: (paste your Neon connection string)
Variable 2:
- Key:
PYTHON_VERSION - Value:
3.11.0(or check your local version withpython --version)
Variable 3 (Recommended):
- Key:
SECRET_KEY - Value: Generate a new secret key (don’t use your development one!)
To generate a secret key:
# In Python shell
from django.core.management.utils import get_random_secret_key
print(get_random_secret_key())
Variable 4 (Optional but recommended):
- Key:
DEBUG - Value:
False
Then update your settings.py to use it:
SECRET_KEY = os.environ.get('SECRET_KEY', 'your-dev-secret-key')
DEBUG = os.environ.get('DEBUG', 'False') == 'True'
Step 5: Deploy
- Click “Create Web Service”
- Render will start building your app. This takes 2-5 minutes.
- Watch the logs for any errors.
Step 6: Verify Deployment
Once the build succeeds:
- You’ll see a green “Live” status
- Your backend URL will be shown (e.g.,
https://my-app-backend.onrender.com) - Click the URL and add
/adminto test:https://my-app-backend.onrender.com/admin - You should see the Django admin login page (even if you can’t log in yet)
Common build errors:
- “ModuleNotFoundError”: Your
requirements.txtis missing a package. Add it and push again. - “Permission denied: ./build.sh”: You forgot
chmod +x build.sh. Run it locally and commit again. - “No module named ‘myproject.wsgi’”: Your start command has the wrong project name.
Phase 4: Deploy Frontend to Vercel
Step 1: Prepare Your React App
Update API calls to use environment variables:
If using Vite, create frontend/.env:
VITE_API_URL=http://localhost:8000If using Create React App, create frontend/.env:
REACT_APP_API_URL=http://localhost:8000Update your API configuration file:
// src/config/api.js or wherever you make API calls
const API_URL = import.meta.env.VITE_API_URL || process.env.REACT_APP_API_URL || 'http://localhost:8000';

export default API_URL;
Update all fetch/axios calls:
// Before:
fetch('http://localhost:8000/api/data')

// After:
import API_URL from './config/api';
fetch(`${API_URL}/api/data`)
Step 2: Test Build Locally
Make sure your app builds without errors:
cd frontend
npm run build
If successful, you’ll see a dist/ (Vite) or build/ (CRA) folder.
Step 3: Deploy to Vercel
- Go to vercel.com
- Sign up/log in with GitHub
- Click “Add New…” → “Project”
- Import your Git repository
- Vercel will detect your project
Step 4: Configure Project
Framework Preset:
- Vercel usually auto-detects “Vite” or “Create React App”
- If not, manually select your framework
Root Directory:
- Click “Edit” next to Root Directory
- Select
frontend(or your React folder name) - Click “Continue”
Build Settings (usually auto-detected):
- Build Command:
npm run buildorvite build - Output Directory:
dist(Vite) orbuild(CRA) - Install Command:
npm install
Step 5: Add Environment Variables
Click “Environment Variables”:
For Vite:
- Name:
VITE_API_URL - Value:
https://your-app-backend.onrender.com(your Render URL, NO trailing slash)
For Create React App:
- Name:
REACT_APP_API_URL - Value:
https://your-app-backend.onrender.com
Step 6: Deploy
- Click “Deploy”
- Vercel builds your app (takes 1-3 minutes)
- Once complete, you’ll get a production URL like
https://your-app.vercel.app
Step 7: Test the Full Stack
- Visit your Vercel URL
- Try making API calls to your backend
- Check browser console for errors
Phase 5: Final Configuration & Security
Update Django ALLOWED_HOSTS
Now that you have your real domain names, update settings.py:
ALLOWED_HOSTS = [
    'your-app-backend.onrender.com',  # Your Render URL
    'your-app.vercel.app',             # Your Vercel URL
    'localhost',                        # For local development
    '127.0.0.1',
]
Update CORS Settings
CORS_ALLOWED_ORIGINS = [
    "https://your-app.vercel.app",  # Your production frontend
    "http://localhost:5173",         # Vite dev server
    "http://localhost:3000",         # CRA dev server
]

# Remove this:
# CORS_ALLOW_ALL_ORIGINS = True
Add CSRF Trusted Origins (if using POST requests)
CSRF_TRUSTED_ORIGINS = [
    'https://your-app-backend.onrender.com',
    'https://your-app.vercel.app',
]
Commit and Push Changes
git add .
git commit -m "Update production settings"
git push
Render will automatically redeploy with the new settings.
Troubleshooting Common Issues
”DisallowedHost at /”
Problem: Django is rejecting the request because the host isn’t in ALLOWED_HOSTS.
Solution: Add your Render domain to ALLOWED_HOSTS in settings.py.
CORS Errors in Browser Console
Problem: Frontend can’t make requests to backend.
Solutions:
- Verify
django-cors-headersis inINSTALLED_APPS - Check
CorsMiddlewareis in the right position inMIDDLEWARE - Make sure
CORS_ALLOWED_ORIGINSincludes your Vercel URL - Ensure you’re using
https://nothttp://for production URLs
”No migrations to apply”
Problem: Database tables aren’t being created.
Solution:
- Check if migration files exist in
yourapp/migrations/ - If they’re missing, create them:
python manage.py makemigrations - Commit and push:
git add */migrations/*.pythengit commitandgit push - Render will run migrations automatically on next deploy
Render Service Sleeping
Problem: First request after inactivity is very slow (15+ seconds).
Explanation: Free tier services sleep after 15 minutes of inactivity. This is expected behavior.
Solutions:
- Accept the limitation (it’s free!)
- Use a ping service like UptimeRobot to keep it awake
- Upgrade to Render’s paid tier ($7/month for always-on)
Static Files Not Loading
Problem: CSS/images return 404 errors.
Solutions:
- Verify
whitenoiseis in middleware - Run
python manage.py collectstaticlocally to test - Check that
build.shincludes the collectstatic command - Make sure
STATIC_ROOTis set correctly
Database Connection Errors
Problem: “Could not connect to server” or “password authentication failed”
Solutions:
- Verify your Neon connection string is correct in Render environment variables
- Make sure the string includes
?sslmode=require - Check that your Neon project is still active (free tier projects can be paused)
- Try regenerating the password in Neon and updating it in Render
Understanding the Free Tier Limits
Render Free Tier:
- 512 MB RAM
- Spins down after 15 minutes of inactivity
- 750 hours/month (enough for one service running 24/7)
- Shared CPU (performance varies)
Vercel Free Tier:
- 100 GB bandwidth/month
- Unlimited deployments
- Automatic HTTPS
- Global CDN
- Analytics included
Neon Free Tier:
- 512 MB storage
- 1 project
- Unlimited queries
- Auto-pauses after 5 minutes of inactivity
- 191.9 compute hours/month
What This Means: Your app is truly free to run, but expect:
- 10-20 second cold starts when services wake up
- Potential slowness during peak shared resource times
- Database will pause when not in use (resumes automatically)
Next Steps
Security Hardening:
- Set
DEBUG = Falsein production - Use environment variables for all secrets
- Implement rate limiting (django-ratelimit)
- Add HTTPS redirects
- Configure proper password validators
Performance:
- Add database indexes for frequently queried fields
- Implement caching (Redis on Render free tier)
- Optimize images before uploading
- Use lazy loading in React
Monitoring:
- Set up Render’s monitoring dashboard
- Add error tracking (Sentry has a free tier)
- Monitor database size in Neon dashboard
Custom Domain (Optional):
- Buy a domain from Namecheap, Google Domains, etc.
- Add it in Vercel settings (frontend)
- Add it in Render settings (backend)
- Update ALLOWED_HOSTS and CORS settings
Why This Stack Works for Free Projects
This architecture gives you production-grade infrastructure without cost:
Decoupled Services: If your frontend gets traffic spikes, Vercel’s CDN handles it without touching your Django server.
Automatic Scaling: Neon scales your database independently of your web server.
Modern DX: Git-based deployments mean updates are just git push away.
Room to Grow: All three platforms offer paid tiers when you need more resources.
For hobby projects, portfolios, and MVPs, this stack provides enterprise-level capabilities completely free.